driving-behavioral-cloning
Built and trained a convolutional neural network for end-to-end driving in a simulator, using TensorFlow and Keras.
Behavioral Cloning in autonomous driving
Objective
Coded a Deep Neural Network to Steer a Car in a game simulator. Neural Network directly predicts the steering angles from the image of front camera in the car. The training data is only collected in track 1 by manually driving two laps and the neural network learns to drive the car on different tracks.
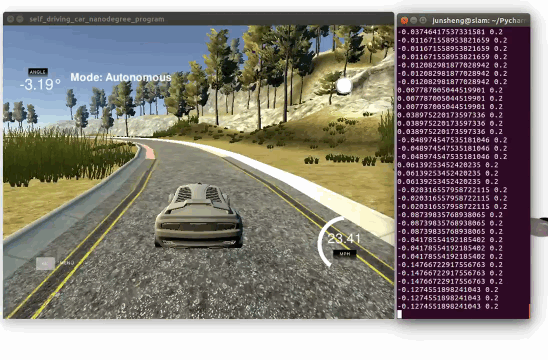
Demo 1: driving on the trained track 1 (Click to see the full video)
Demo 2: driving on an unseen track 2 (Click to see the full video)

Steps
- Use the simulator to collect data (front camera frames and steering angles) of good driving behavior on track 1.
- Build a convolution neural network in Keras (tensorflow as backend) that predicts steering angles from images.
- Train and validate the model with a training and validation set on track 1.
- Test that the model successfully drives around on both trained track 1 and unseen track 2.
1 Code & Files
1.1 My project includes the following files
(Note: the hyperlinks only works if you are on the homepage of this GitHub reop, and if you are viewing it in “github.io” you can be redirected by clicking the View the Project on GitHub on the top)
- model.py containing the script to create and train the model
- drive.py for driving the car in autonomous mode
- model.h5 containing a trained convolution neural network
- README.md summarizing the results
- environment-gpu.yml environment file with GPU
- images folder contains the sample images
1.2 Pre-built simulator
You can also build it by yourself from here.
1.3 Dependencies & my environment
Anaconda is used for managing my dependencies.
- OpenCV3, Python3.5, Kera, CUDA8.0 are used
- you can use provided environment file with GPU to install the dependencies, by
conda env create -f environment-gpu.yml
source activate evn-gpu
My computer setting is as follows:
- GeForce GTX 980M, Intel Core i7@2.7GHzx8, 32G memory, Ubuntu 16.04
1.4 How to run the code with pre-coumputed model
Using the Udacity provided simulator and my drive.py file, the car can be driven autonomously around the track by following two steps:
(1) Launch the Udacity simulator, and enter AUTONOMOUS MODE.
(2) Drive the car by executing:
python drive.py model.h5
1.5 How to run the code with your own model
(1) Launch the Udacity simulator, and enter TRAINING MODE.
(2) Record your own manual driving sequences and save them as csv file.
(3) Train your model with saved sequences.
(4) Test your model in AUTONOMOUS MODE (following steps in 4).
1.6 Release History
- 0.1.1
- Update the documentation
- Date 19 April 2017
- 0.1.0
- The first proper release
- Date 15 Feb 2017
2 Model Architecture
2.1 The model architecture has been employed
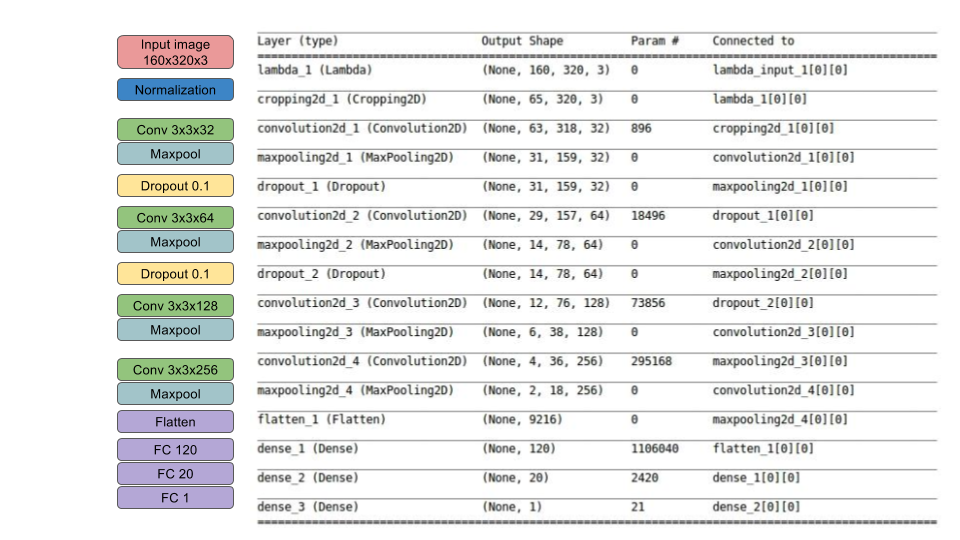
My model consists of a convolution neural network with 4 conv layers which have 3x3 filter sizes and depths vary between 32 and 256, and 3 fully connected layers. The model includes RELU layers to introduce nonlinearity (e.g. code line 145), and the data is normalized in the model using a Keras lambda layer (code line 143).
2.2 Attempts to reduce overfitting in the model
The model contains dropout layers in order to reduce overfitting (model.py lines 147 and 150). The model was trained and validated on different data sets to reduce overfitting (code line 214-218). The model was tested by running it through the simulator and ensuring that the vehicle could stay on the track.
2.3 Model parameter tuning
The model used an adam optimizer, so the learning rate was not tuned manually (model.py line 225). The batch_size and nb_epoch are set (model.py line 163 and 244)
3 Training Strategy
3.1 Appropriate training data
Training data was chosen to keep the vehicle driving on the road. There are three cameras (left, center, right) mounted on the front of the car, and I used all three cameras in training. This is because we need to handle the issue of recovering from being off-center. For details about how I created the training data, see the next section.
3.2 Creation of the Training Set & Training Process
3.2.1 Camera setups
The simulator has three cameras: a center, right and left camera. One example is as follows:
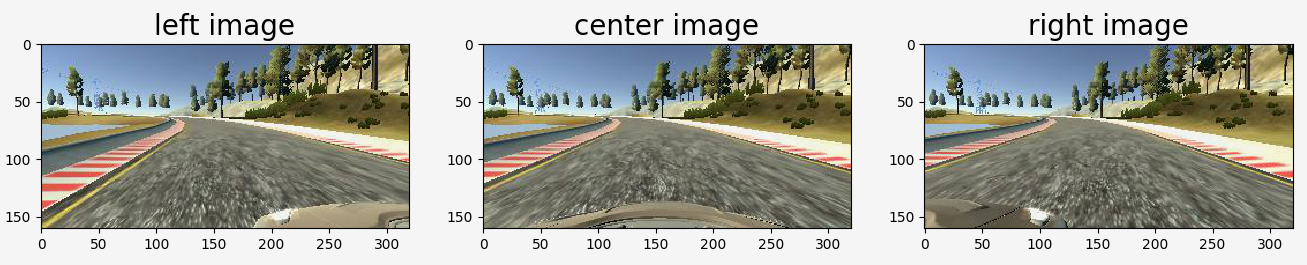
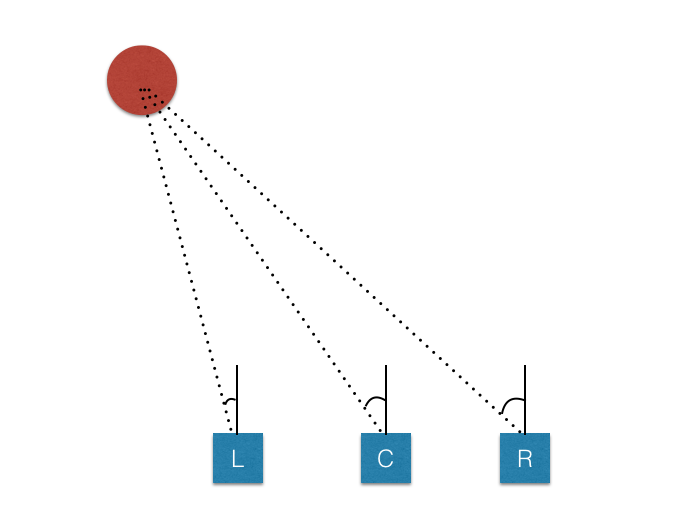
To capture good driving behavior, I recorded two laps on track 1 using center lane driving. In the training stage, I use all three cameras as training inputs. This is because we need to handle the issue of recovering from being off-center driving. How to achieve this:
- If we train the model to associate a given image from the center camera with a left turn, then we could also train the model to associate the corresponding image from the left camera with a somewhat softer left turn.
- And we could train the model to associate the corresponding image from the right camera with an even harder left turn.
- To estimate the steering angle of the left and right images, I use a correction value of 0.2 (in radians) see model.py line 192 and 194.
In the simulator, we could also weave all over the road and turn recording on and off to record recovery driving. However, in a real car, that’s not really possible, or at least not legally. So, I decided not to record the vehicle recovering from the left side and right sides of the road back to center.
Then after a few test with my network, I found it doesn’t perform well in sharp turns, so I record a few more driving examples in turning for my network to learn.
3.2.2 Data Augmentation
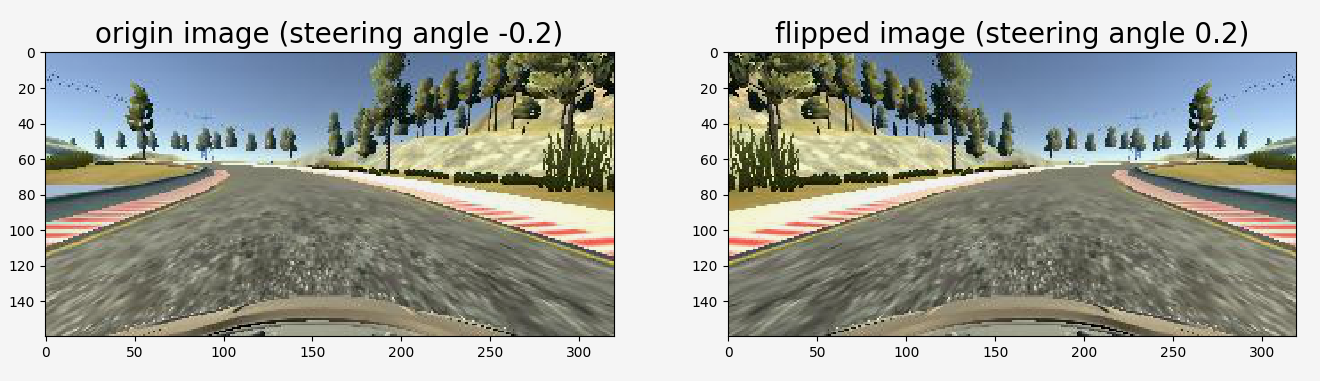
- Image Flipping: In track 1, most of the turns are left turns, so I flipped images and angles (model.py line 19). As a result, the network would learn both left and right turns properly. Here is an image that has then been flipped:
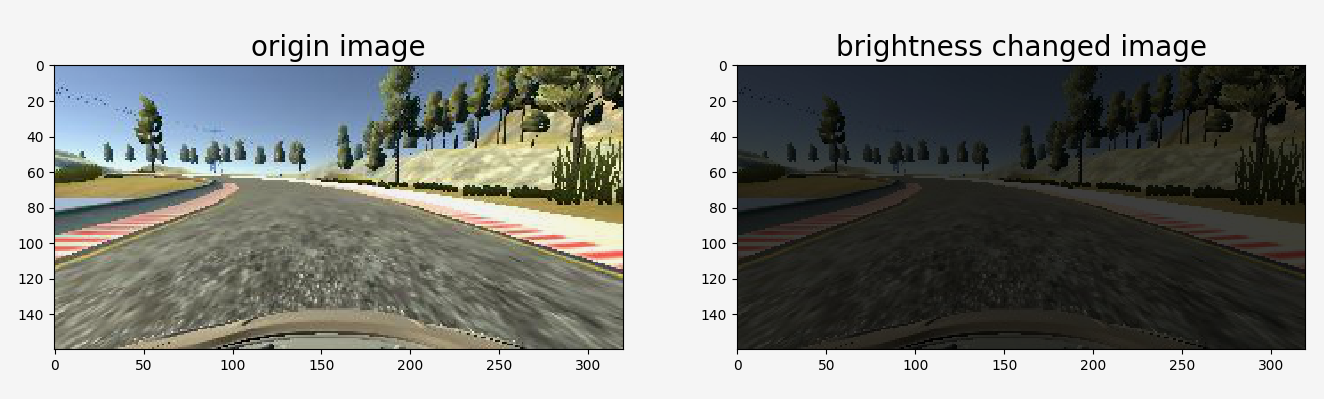
- Brightness Changing: In order to learn a more general model, I randomly changes the image’s brightness in HSV space (model.py function brightness_change)
3.2.3 Data Balancing
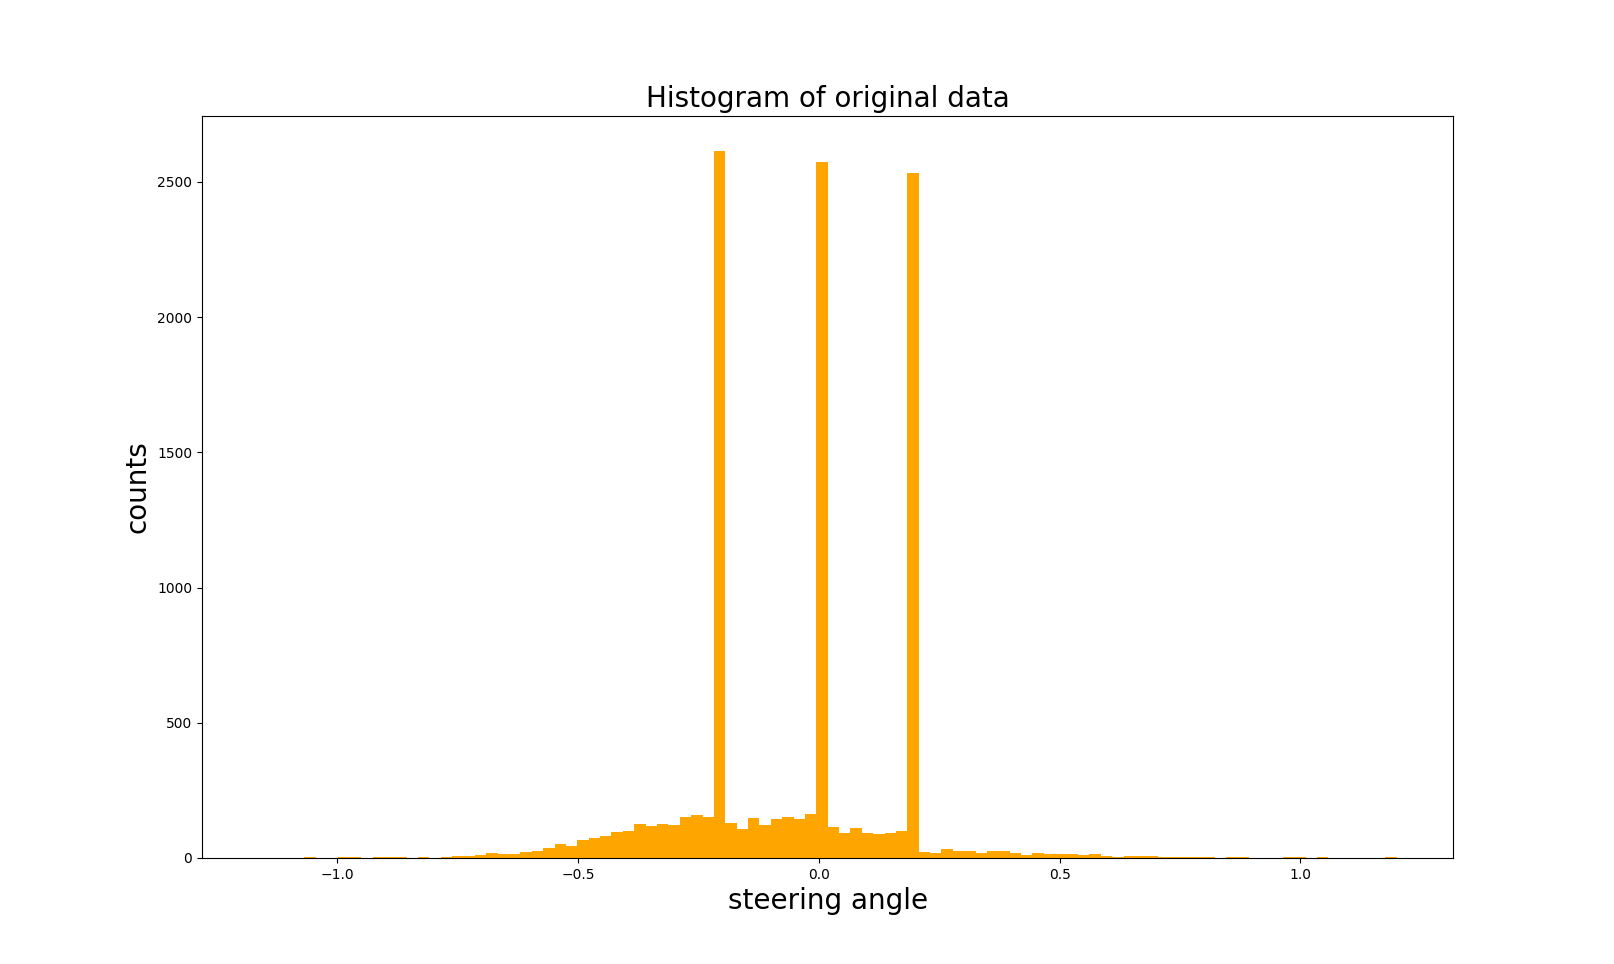
- Collected data is not balanced, we can see the steering angle historgram as shown below and data balancing is a crucial step for network to have good performance!
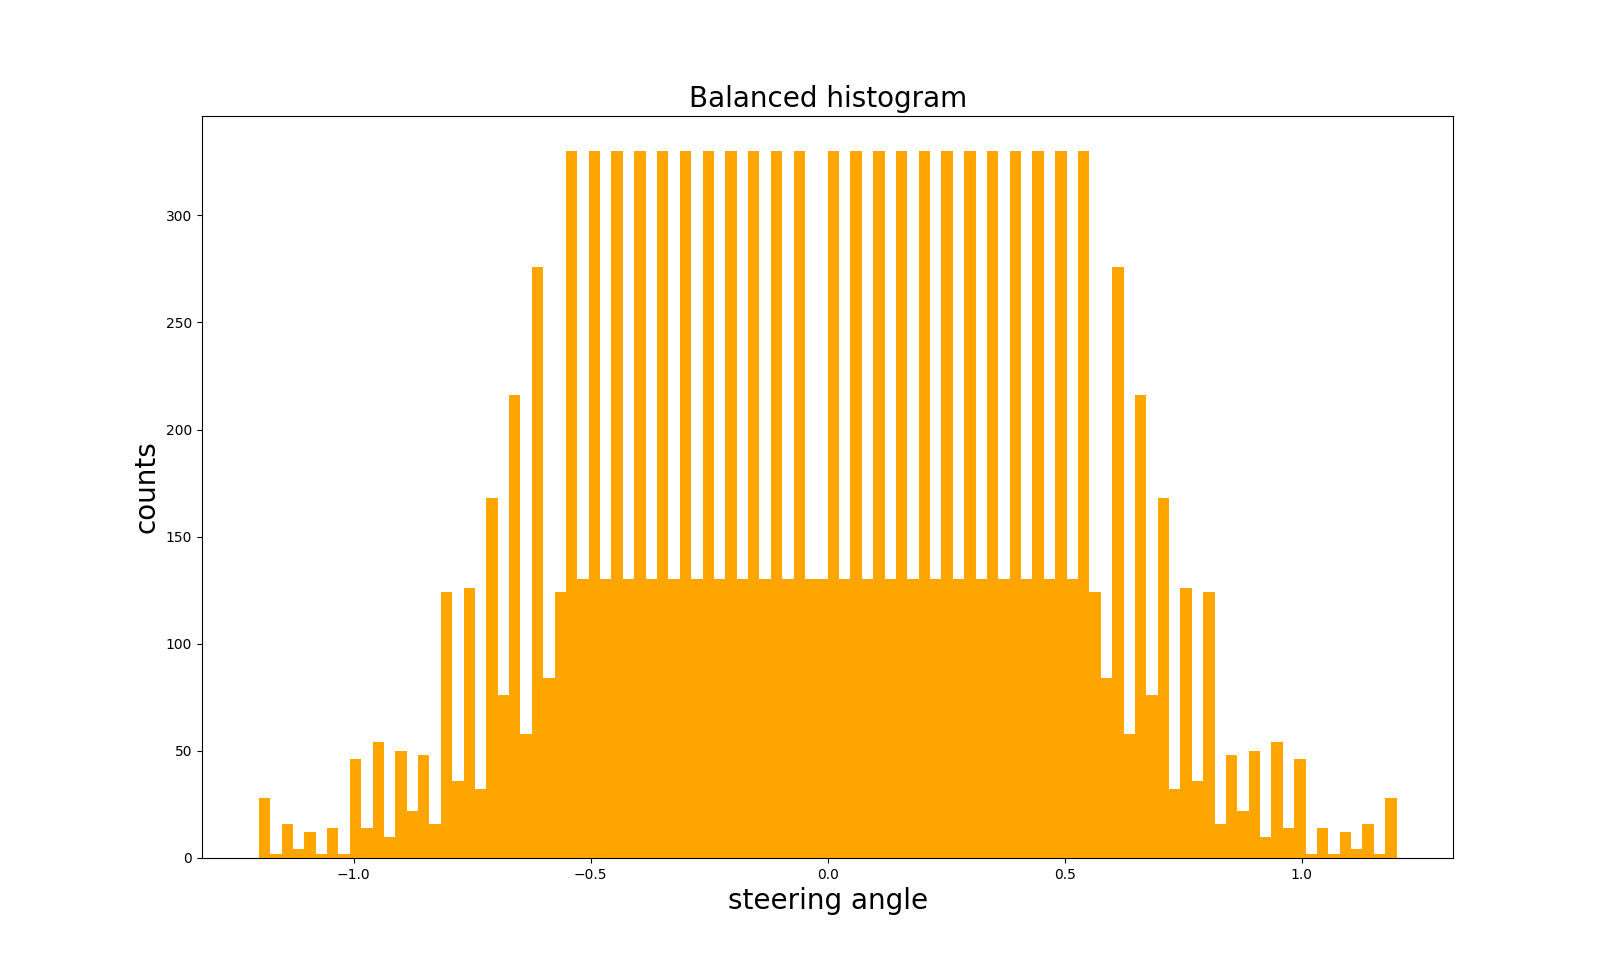
- In order to balance the data, we need to reduce the number of high bins, and I did it as in function balance_data in model.py. After the steps of collection, data augmentation and data balancing, I had 11120 number of data points. The results are shown below.
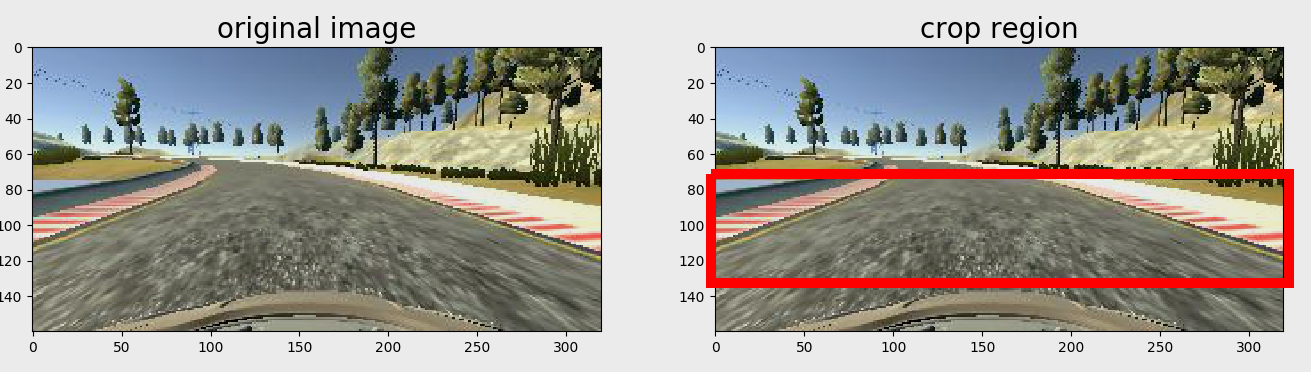
3.2.4 Image Crop
- In the image, the up part (sky) and bottom part (front part of the car) are not very useful for training, and on the other hand, it might lead to overfitting. So that I decided to crop out only the most useful part, and this is done in GPU for efficiency (model.py line 144)
When we process the left and right camera, we add corrections (+0.2 or -0.2) for their steering angles because we only know the ground-truth steering angle for the center camera (as given by Udacity simulator). Therefore, it may introduce some small errors for the steering angles of left and right images. So, I decided that in the validation data, I only use the center camera. Finally randomly shuffled the data set and put 30% of the data into a validation set (code line 214).
I used this training data for training the model. The validation set helped determine if the model was over or under fitting. The ideal number of epochs was 4 as evidenced by the validation loss is not getting lower anymore. I used an adam optimizer so that manually training the learning rate wasn’t necessary.
4 Model Design Approach
My first attempt was to use a convolution neural network model similar to the LeNet, however it doesn’t performs well enough, high loss in both training and validation. So, I take two approaches: (1) balance the training data as well as (2) change the model similar to VGG net - with configuration A
My proposed model is derived from VGG and LeNet, which is more complex than LeNet but smaller than VGG. Later, I found that my model had a low mean squared error on the training set but a high mean squared error on the validation set, which implied that the model was overfitting. So, I added tow dropout layers into the model and reduce the number of neurons in FC layers. Then I noticed that both the train loss and validation loss are small.
In the driving test, I found that the model works on both track 1 and even an unseen track 2 without leaving the road.